Did you know that you need to optimize photos for SEO to get the most online benefit? Yes, it’s true. There is lots more to effectively using photographs to promote your business and build your brand than merely capturing pretty kitchens or baths or laundry rooms with your iPhone.
High quality photos are the life’s blood of our business. How to convey your talent and expertise if you can’t use photos? Before-and-Afters are a proven technique to show how your process works.
Of course you have a website, and probably a Facebook, Insta, Pinterest and Houzz profile, all require more photos. That’s why it’s so darn important to understand the power of the photo and how to use it to your advantage.
Optimize Photos by Reducing Size
The main purpose of your website is to convince people of your talents and get them to contact you. And photos work to get your message out there.
One of the main reasons a person will leave your website is if it loads too slowly. And the primary culprit for why it takes too long to load is photos that are too large. Users expect websites to load quickly, and if they don’t, it can lead to high bounce rates (i.e., they’ll leave). Research shows that most users expect a website to load within 2-3 seconds. If a website takes longer, users most likely will leave and go to one of your competitors.
And although the main point of this article is about optimizing photo formats and sizes, here’s a little tangent about the impact a slow loading website can have on your digital presence. It all comes back to photo size!
The Impact Large Photo File Sizes Have on Your Online Presence
Slow load times lead to a poor user experience. Visitors associate slow performance with poor quality, not something you want your website to project. A slow website creates a negative first impression. Users may view your website as unreliable or poorly maintained. This can damage your reputation and make users less likely to trust the information on your site.
Google takes site speed into account when ranking pages. A slow website will perform poorly in search results, and thus, in turn, poor performance will reduce organic traffic. This is how your website ends up on page 5 of search results. Google emphasizes user experience and speed as key ranking factors. (Of course, there’s other factors that affect where your site ends up in search results.)
Long wait times can cause users to leave your website altogether. Research shows that a 1-second delay in page load time can result in a 7% decrease in conversions.
Back to how to optimize your photos for best results.
An Example
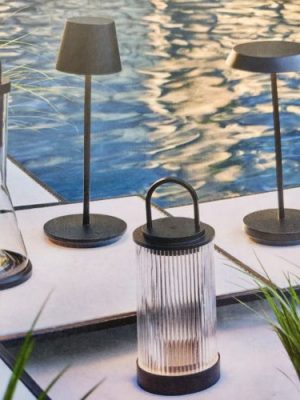
Say you’ve just finished an outdoor kitchen and are getting photos ready to post to your website and socials. One of the pics you took with your phone is a shot of pretty romantic lights around the pool deck.
It needs to be re-sized before posting, and here’s why.
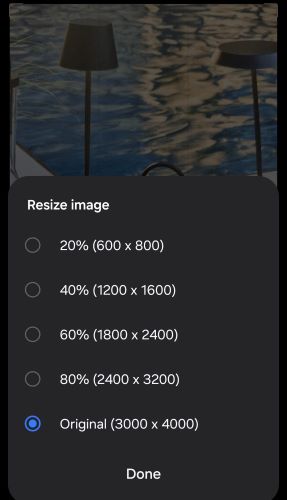
The original size is 3000 x 4000 pixels – much too large for web use.
Recommended image sizes for websites:
- Small images: 100×100 pixels
- Medium images, such as those used for blog post and product images: 600×400 pixels
- Large images, such as those used as backgrounds or banners: 1200×800 pixels
Our example photo is much larger than the recommended size, and it’s not intended to be a background or a banner. Using these numbers, we would re-size the pic to 20% of its original size.
Re-size to Optimize Photos
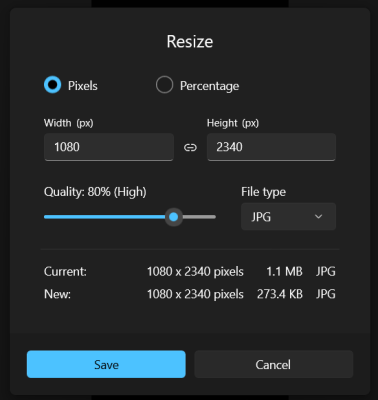
If you don’t re-size on your phone, you can do it in your photo editing software program. Here’s our photo opened in Microsoft Photos.
The number of pixels refers to the image resolution.
The file size is measured in kilobytes (KB) or megabytes (MB). This is how much space the image takes up, and the larger the file size, the longer it takes to load.
Tools like TinyPNG and JPEGmini are programs specifically designed to compress large file sizes. All web hosting programs include built-in options to reduce file size without losing much quality. Bob Aungst Cabinet Sales is a WordPress site, and the file compressing plug-in is called Smush. Appropriate! We conscientiously reduce pixel resolution sizes before uploading, but we leave it to Smush to take care of the file size.
How the Computer Shows Photos
When your website displays a photo, first it processes the digital image data, or the pixels. Each pixel contains information about color and brightness, which, when taken together, forms the image we see.
How this happens is all fairly technical and info we don’t really need to know to be successful, but here it is extremely simplified.
You post a JPEG photo of one of your kitchens to your website. For a visitor to see it, the computer’s CPU must process the file, decompress the pixel data, and send it to the display. Each pixel’s color value is used to light up the screen at the correct intensity for the colors, recreating the image of the kitchen. This happens in milliseconds, allowing visitors to your site to see images almost instantly.
Wow. You have to love technology.
Before Optimizing Photos, Understand the Digital Photo File Formats
Digital photographs come in different formats, and the each of the various formats works in certain ways. The file formats dictate how images are compressed, stored and rendered by your digital devices – computers, iPads, tablets and phones.
JPEGs / JPGs
We are probably most familiar with the JPG or JPEG, as it is the most common format used in digital photography. JPEG stands for Joint Photographic Experts Group, not that we need to know this. JPGs are best for sharing and everyday use, and JPG is the format we default to when sending or posting photos.
The JPG format uses lossy compression. Don’t freak out – that only means that some image quality is sacrificed to reduce the file size. It truly takes the eye of a trained professional to spot the minor quality deterioration that occurs in a re-sized JPG. The only time this becomes an issue is when a photo is saved over and over again, then you’ll see some blurriness or loss of sharp details, but for most people’s purposes it’s not an problem.
Another attractive feature of the JPG format is that it supports 24-bit color. Again, this is a technical detail not necessarily important to our use of the pics, but here it is. The JPG format allows it to represent over 16 million colors.
Virtually all devices, operating systems, and image software support the JPG format. For those of us who are not professional photographers, this is our go-to. If, however, you want to print a high quality photo, like for a brochure or postcard, your printer is probably going to ask for another format.
.

PNGs
PNG stands for Portable Network Graphics. As opposed to JPGs, PNGs use lossless format, which means more details of the photo are preserved, but the file sizes are larger. This is truly NBD when you use a photo editing program that allows you to resize your pics.
The lossless compression used by PNG format makes it ideal for images that need to maintain their full resolution and detail, such as logos and graphics with text. If you use Canva for creating social media posts, you’ll know the PNG format because that’s what Canva uses for its downloads.
PNG supports 24-bit color, which means it can display up to 16 million colors, just like JPG.
TIFFs
You won’t be using the TIFF format for posting photos to your socials. If you work with a professional photographer, you’ll get your photos in TIFF format. This format maintains the highest quality, however, the files are very large. And we mean VERY large. They can be difficult to work with on a computer, even to re-size.
GIFs
You won’t be using the GIF format for posting photos either; however, you may run across it so it gets a mention. The Graphics Interchange Format or GIF is used for simple animations. It is not suitable for high quality photos because it’s limited to 256 colors.
HEIFs, WebP and AVIF
Here’s a couple new ones you may see. HEIF stands for High Efficiency Image Format, used primarily on iPhones. It uses advanced compression that results in smaller file sizes with better image quality than JPGs. Like another new format AVIF, a professional web developer will be required to convert your jpgs to these formats for your website. You can’t save your phone photos to these formats.
WebP is a modern image file format that Google developed to make images smaller than JPEG and PNG yet still look good. WebP files load faster.
Optimizing Photos for Best SEO Results
Optimizing photos for SEO involves several steps to ensure that images contribute to your website’s search engine rankings and user experience. Here’s they are:
- Use the right image format. JPEG and PNG are your go-tos.
- Compress Images. Smaller file sizes lead to faster loading times. Tools like TinyPNG or JPEGmini will reduce the file size without sacrificing quality. Remember – your website most likely includes one of these file compression plug-ins. If your site is WordPress, it definitely does.
- Use Descriptive File Names. This is a biggie. In our earlier example of the romantic pool lights, the file was named IMG20240916_144116.jpg. What does that tell anyone or any thing, like Google? Nothing. Thus, renaming is essential. Since this pic is from an outdoor kitchen shoot, you will probably use “outdoor kitchen” as one of your keywords. So, rename the pic something like Lights-in-Outdoor-Kitchen.jpg”. Use hyphens to separate words because search engines read hyphens as spaces.
- Add Alt Text. When saving photos for use on your website or in social media, you want to include descriptive alt text for each image. This helps search engines understand the content of the image. In WordPress, the place to add Alt Text is shown with every pic you wish to add. So, although it’s not automatic, it’s there to remind you every time.
- Use Appropriate Image Dimensions. Resize images to the dimensions needed on your website. Avoid using large images.
- Use Captions. Search engines use captions to understand the image. Your images should be placed near relevant content to reinforce their context.
Additional Tips for Optimizing Photos
Keep these things in mind when adding images to your website or socials.
- Use a relevant image that matches your text
- Pick an appropriate file name for your image that says what the pic shows. Plus use one of your article’s keywords.
- Make sure image dimensions match the image size as displayed
- Reduce file size for faster loading
- Add a caption to make it easier for Google to scan the page
- Always use image alt text.
- Provide all the context you can
Conclusion
We’ve assembled these steps so that you can optimize your images for both search engines and users. Sure, you can upload photos directly from your phone to your website, however if you do, you will not realize any of the advantages that optimized photos will get you. Better placement in Google search results, longer visits by prospects and increased conversions are all within reach when your photos – and the rest of your site, of course – are optimized for SEO.
Bob Aungst Cabinet Sales is a full-service rep agency with the goal of matching kitchen designers and remodelers with the cabinet manufacturers best suited to their business’ style and clientele. Owner Bob Aungst III represents Brighton Cabinetry, US Cabinet Depot, Integrity Cabinets and StyleCraft Luxury Custom Cabinets.